The map lets any player show locations of interest in the world without spoiling the element of exploration.
No access to the Minecraft server files is required to create a map, and having your own web hosting is not necessary either.
(Alternately, for anyone with admin access to the server, their own hosting, and who doesn't mind removing the element of exploration, map systems such as Overviewer can provide a nice full online map system)

Oceans can be shown by the map if you know the seed for your world. See the section on adding oceans for how to do this.
Other map examples:
- Map showing all the available location types
- Customized icons example
- The example map with ShowCoordinates turned on
Creating your own
- Create a .txt file containing all your map locations, and make it available on the web, or upload to Dropbox.
- Add the encoded direct URL of your map locations file to the end of this URL:
https://buildingwithblocks.info/map173/index.html?src=
- You're done!
If you like, you can add oceans.
Running it from your Dropbox, or a wiki page.
Example using Dropbox.
To create your own map you take the URL of the Ink & Parchment map generator and add your own settings to the end of it. One of the settings you will add is a URL for a file or page which contains all the locations you want displayed on your map, this file could be in your Dropbox, it could a wiki-page, or a webpage.
More details of how to specify the URL of the locations file
If you're going to collaboratively build the map with others, then a shared editable file like a wiki page is good places to keep the list of locations - that way everyone can edit the list and the map generator can read the locations directly from it. The locations list can be in either html format or txt format.
Often sites will block "cross-origin resource sharing", which is where one site, such as buildingwithblocks.info, is prevented by your browser from loading data from a different site, such as wikipedia.org. This can reduce mischief on the web, but also limits your options for where the locations file can be loaded from if you don't wish to host the map generator yourself. See the next section for more details.
Can I trust this to not disappear after I've started using it?
You can download your own copy of the map generator and run it locally straight off your computer. Or host a copy on your own website.
Obviously though, I intend to keep it available from this website.
If you want to maintain your locations list in a wiki-page then you may need to host your own Ink & Parchment map anyway - so that it's on the same domain as the wiki. For security reasons, browsers won't allow the map generator to access your locations list unless both their addresses share the same domain, so...
that means if you don't want to host the map generator yourself, and just want to use the one already hosted here, then you must create your locations list on a site which allows cross-origin resource sharing, such as Dropbox.
I haven't mentioned other cloud file/hosting services as I've not tried them, they probably work fine though.
Making a location list file
An example location-list file.
A template location-list file.
You can automatically generate your location-list file if you know the seed for the world.
The Location list file is a list of locations, one per line. Each line gives a location type and its Minecraft x and z coordinates. You can use F3 in Minecraft to get coordinates (or from Rei's Minimap).
If your location list file is a text file, then the filename must end in either .txt or .csv (I recommend .txt because an office application
might open a .csv file and mess it up). Locations are specified in comma separated format. For example:
type,             x,     z,    description,                      owner,       href, icon-index

DesertVillage,  245,   350, "Ghost town"
WitchHut,     -4056, -2487,
PlayerHouse,   -800, -1800, "Dr.Frankenstone's mountain lair", "Dr.Frankenstone", "", 31
If the location list is an html file (for example a wiki page), then the locations can be specified either with unordered "bullet" lists in the same comma separated format, e.g:
- DesertVillage, 245, 350, "Ghost town"
- WitchHut, -2056, -2487
- PlayerHouse, -800, -1800, "Dr.Frankenstone's mountain lair", "Dr.Frankenstone", "", 31
or by using a table:
| Type | x | z | Description | Owner | href | IconIndex |
| DesertVillage | 1245 | 350 | Ghost town | |||
| WitchHut | -2056 | -2487 | ||||
| PlayerHouse | -400 | -1800 | Dr.Frankenstone's mountain lair | Dr.Frankenstone | 31 |
(Or with a combination of bullet lists and tables)
Settings for the map, such as showcoordinates can also be specified in your location list file.
Any line in the file that does not start with one of the location-types or a setting-name is ignored. So the line containing column headings is ignored, because "type" is not a location name nor the name of a setting.
Locations
Each location may have up to 7 columns (or comma seperated values) of information:type, x, z, description, owner, href, icon-indexbut only the first 3 items are required (type, x, z).
type
The first column specifies the type of location, and must be one of the following:
- Spawn
- PlayerHouse
- PlayerCastle
- PlayerFarm
- PlayerMachine
- PlayerStructure - a generic catch-all block for things players have built that defy any more specific icons.
- EnchantingRoom
- Village
- DesertVillage
- SavannahVillage
- JungleTemple
- DesertTemple
- WitchHut
- NetherFortress
- NetherPortal
- Forest
- FlowerForest
- MushroomIsland
- Horse
- Wolf
- Dragon - a dragon. You can use it to indicate an End portal, the Ender Dragon, or just as "Here be dragons" map decoration.
- SeaMonster
- Ship - a sailing ship. You can use it to decorate the map and indicate ocean.
- FenceOverlay
- IslandOverlay
- Label - a location-type that has no icon by default, you can use it to place plain text onto the map.
The location-type determines the default icon to be drawn at the location, and some have a default href (for example, Village locations link to http://minecraft.gamepedia.com/Village by default). However both the icon and the href of a location-type can be overridden by placing your own values in the appropriate columns.
Given that any location-type can be set to display any icon or href, their purpose is only to make the list easier to read, and to save having to repeatedly type out the details.
x and z
The x and z columns should contain the area's coordinates from Minecraft (press F3 in the game to see your coordinates).
Don't worry about decimal places, just round the coordinates to whole numbers.
description and owner
Description and owner are optional and determine how the map location will be labelled. They don't need to be inside double-quotation marks (") but putting them in quotemarks allows the following:
- You can insert a \n in your text if you want to split the line.
- You can add spaces to pad out the start or end of your label if you want to nudge its position slightly
to avoid something else on the map nearby.
(Note that html collapses multiple spaces into one, so in a wiki you'd have to type out the code lots of times instead of just hitting the spacebar) - You can use quotation marks inside a label when it's surrounded by quotation marks. Do this by placing two in a row, for
example
"My ""Scare quotes"""will be drawn asMy "Scare quotes".
(Note that quotation marks cannot be used in a label unless it's surrounded with quotation marks) - You can also use commas inside a label when it's surrounded by quotation marks.
Having full control of this markup is why I recommend editing the file with a text editor instead of a spreadsheet or office application.
If you want to make a label invisible, you can surround it with tildes, e.g:
PlayerHouse, 100, 100, Mansion, ~owner~
If you want to force a label to always be shown - even when it will overlap another label or icon, you can surround it with exclamation marks, e.g:
PlayerHouse, 100, 100, !Mansion!, owner
When two labels overlap, locations that are higher in the list will have their label displayed in preference to the label of a location lower in the list. By default, all labels are shown in the most zoomed-in view.
The visibility of labels can also be controlled using the hidelabelsabove and showlabelsbelow settings.
href
By placing a URL in this column you can make the map location clickable (and the chain-link icon appears when hovering the mouse over the location). Some suggested uses:
- A link to pictures of the location, or information.
- A link to information about the player
- If the location is a portal, then link to a Nether map. The portal in the example map demonstrates this (however, to understand the example portal links you should also read about specifying an href target, below).
- If the location is a player town, then link to a town-scale map (the same way the portal in the example map works).
Clearing a link
If the location-type has a default link but you don't want the location to link to anything, then place a hyphen in the href column to disable the link.
Specifying an href target (Advanced stuff)
Normally this is not necessary and you don't need to know it. However if you decide to use the map inside an iframe then the default href target will become “_parent” — to ensure that clicking on a link will open it in the main window instead of just inside the iframe's area.
But if you want the link to open only inside the iframe's area, for example if the URL was a link such as ?src=example_nether.txt (to load the map
with Nether locations), then you will have to specify that “_self” is the target.
To specify both a target and a URL in this column, write the target followed by an underscore followed by the URL. For example if the target is “_self” then the value
written in the href column might be _self_http://my-url.com.
Valid targets are “_blank”, “_self”, “_parent”, or “_top”.
icon-index
There are more icons available than can be specified with the location-type. The icon-index field lets you manually choose the icon to be displayed at the location. The stock icons and their icon-index can be viewed in this Legend Map. You can also add your own.
You'll notice two styles of icons, some are in Minecraft style and others are in the hand-drawn fantasy map style, the idea was to give the impression of Minecraft structures on a fantasy map.
Settings
Map settings such as showcoordinates can be specified either in your location-list file, or in the map's URL. Settings in the URL will override settings in the location-list file, allowing the creation of different URLs for different views of the same location list. For example a portal might link to a the URL of a map for the Nether, but with x and z specified so the Nether map will be centered on the portal that was clicked.
Rather than comma separated values, settings take the from of setting=value. Settings must have one line each when in a location-list file, but
are all on the same line when specified in a URL - separated by "&" symbols.
When text values are specified for a setting in a URL, then if they contain spaces or punctuation you should encode the value first, to ensure the URL remains valid.
Example of specifying settings in a location file:
title = Map of Treasure Island
range = 6400
Example of specifying settings on the end of a URL:
https://buildingwithblocks.info/map173/index.html?src=example.txt&title=Map%20of%20Treasure%20Island&range=1600
The following settings are available:
- range
- title
- blurb
- x
- z
- icons
- showorigin
- showscale
- showcoordinates
- hidelabelsabove
- showlabelsbelow
Required URL setting: src
The URL must always* include the src setting. The src setting cannot be specified in the location-list file.
There are no other required settings.
src tells the map generator where to get the location-list file, or webpage. It can be a relative or absolute URL, and you should encode its value to help keep the map URL nicely formatted.
* This setting can be hard-coded into the html file if you are hosting it yourself. This avoids requiring it on the URL.
range
This sets the radius the map will cover, it defaults to 3200 which makes the map 6400 Minecraft blocks wide and 6400 Minecraft blocks high by default.
Tip: Try to make the range a multiple of 32, as this results in the scale at the bottom-left of the map showing nice round numbers. (This is because there are 64 blocks in the map background texture, and the scale is aligned to the texture to help make it easier to estimate distances)
Example - map with range set to 1600
title
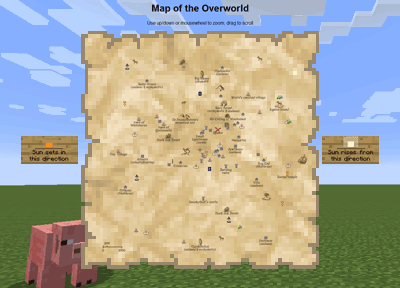
This defaults to "Map of the Overworld", but you probably want to give your map its own name, or have a "Map of the Nether", this option lets you set the title of the map.
You can put HTML in the value for this. If you are specifying the title in the URL remember to encode the value. (You don't need to encode it if you're setting the title from within the location-list file - which is the normal way of doing it)
blurb
This defaults to "Use up/down or mousewheel to zoom, drag to scroll", but you might have something more interesting to say, or something you want to link to.
You can put HTML in the value for this. If you are specifying the blurb in the URL remember to encode the value. (You don't need to encode it if you're setting the title from within the location-list file - which is the normal way of doing it)
x and z
Setting these values allows you to specify where the map will be centered. The map defaults to 0, 0.
Example - map centered on the spawn point
showorigin
This can either be set to true or false. If set to false then the crosshairs at the 0,0 position on the map will not be drawn. The default value is true.
showscale
This can either be set to true or false. If set to false then the distance scale at the bottom-left of the map will not be drawn. The default value is true.
Example - map with no distance scale
showcoordinates
This can either be set to true or false. If set to true then the Minecraft coordinates of a location will be displayed when you hover the mouse over it. The default value is false, because Notch gave Steve a compass, not a GPS ;)
hidelabelsabove
This specifies the "zoom-level" that must be reached before labels are displayed. It defaults to 0, which means labels are always shown.
Example - map with labels disabled on the outermost zoom-level.
showlabelsbelow
This specifies the "zoom-level" at which all labels will be displayed, even if they overlap other labels or icons (labels are normally only displayed when then don't overlap other items in the map). It defaults to 3, which means that at the last zoom-level (3), all labels are shown.
Example - map with all labels shown at all zoom-levels.
icons
If you want to make your own icons you can place them in a .png file, make the .png file available from the same location as the location list
file, and use the icons setting to add them to the list of icons available to the map (their icon-indexes will begin at 64).
Icons are square and all icons in a file are the same size, the .png file should be twice the height of the icons (to allow room for the icon and its background).
You specify the size of your icons via the height of the .png file, see the iconguide.png file.
The icons setting can be a relative or absolute URL. Remember if you are specifying it from the URL to encode the value to help keep the map URL nicely formatted - you don't need to encode it when you're setting icons from within the location-list file, which is the normal way of doing it.
oceansrc
Use this if you want your map to show oceans*. See the section on adding oceans for usage examples.
oceansrc tells the map generator where to get the ocean map file (aka ocean mask). It can be a relative or absolute URL, and you should encode its value to help keep the map URL nicely formatted.
If you use oceansrc then you should also read the section Optimizing oceans for faster load times.
* This setting can be hard-coded into the html file if you are hosting it yourself. This avoids requiring it on the URL.
oceantheme
Selects the style in which to draw oceans on the map. The following themes are available:
So currently there are three themes, and with each you can choose whether the pixelation should be hard or more shaded. Hard doesn't look as nice, but is perhaps truer to Minecraft's artistic style. Coastal Relief is quite a hard theme already, so coastalreliefhard looks very similiar.
Showing oceans on the map
- Obtain the seed for your world.
You can do this by typing the
/seedcommand into the Minecraft console while you're playing in that world (press T). If you're playing on a server then you'll probably need to ask the server administrator for the seed — and they may say no, since the seed can be used to create a very detailed map. If they say no, you could ask the server administrator to generate the ocean mask file themselves and send you that instead of the actual seed (worked with my server admin!).The
/seedcommand doesn't let you copy/paste the seed, so if it's too long to remember then you can exit to the menus, select your world in Single Player, and click the "Re-Create" button, followed by the "More World Options..." button — this shows the seed in a textbox where you can use Ctrl+A Ctrl+C to select and copy it. - Use AmidstExporter to export the ocean mask
.pngfile. (an example of an ocean mask) - Copy your ocean mask file to the same place as you keep your locations list file, and add an oceansrc setting to the URL — just like how the src setting points to your locations list file.
- You're done!
If you like, you can choose a style for how the ocean will be shown.
Examples
https://buildingwithblocks.info/map173/index.html?src=example.txt&oceansrc=example-ocean.png
https://buildingwithblocks.info/map173/index.html?src=example.txt&oceansrc=oceanmask.png&oceantheme=coastalreliefhard
Optimizing oceans for faster load times
It's better to specify oceansrc in the URL rather than in the locations list file, because when specified in the locations list it means the page can't begin loading the ocean map file until after the locations list file has finished loading (and it can't start creating the map until the ocean map file has finished loading).
When the ocean map file is provided on the URL, it can be loaded in parallel with the locations list file, so the map can begin as soon as the locations list has loaded.
If you are hosting your own copy of the Ink & Parchment Map, you can also make it faster by specifying the ocean map file inside the html file.
Extra features
Poster prints
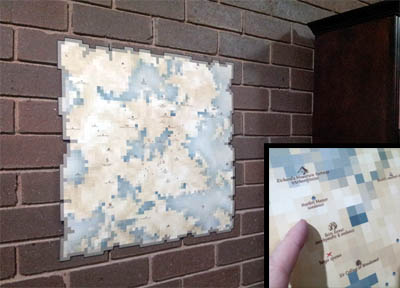
Instead of scrolling around fully zoomed in, the entire map can be printed out as a large poster.
When viewing a map online, there's a small icon at the bottom-left corner of the screen, clicking on that brings up options for make a poster sized image of the map.
Here's the poster I made from our server's map, and how I made it.
iframe support
You can include maps inside your own webpages by using iframes.
iframe demonstration, with example HTML.
Setting a default src, so URL arguments aren't necessary
If you're hosting an Ink & Parchment Map page on your own website, and want the src to be built-in rather than specified on the page's URL, you can edit the index.html file to do this.
Find the following line in index.html:
// SetDefaultSrc('default.txt');
Uncomment it (i.e. remove the // from the start of it), and set 'default.txt' to be whatever you want the location-list file to be called (or just name your location-list file default.txt).
Setting a default oceansrc, so URL arguments aren't necessary
If you're hosting an Ink & Parchment Map page on your own website, and want the oceansrc to be built-in rather than specified on the page's URL, you can edit the index.html file to do this.
Find the following lines in index.html:
<div class="resources" style="position: absolute; visibility: hidden;">
	<img id="map-background" src="img/map64.png"/>
	<img id="map-tileset" src="img/glyphs.png"/>
</div>
and add your ocean map image, using the id "oceanmask", for example:
<div class="resources" style="position: absolute; visibility: hidden;">
	<img id="map-background" src="img/map64.png"/>
	<img id="map-tileset" src="img/glyphs.png"/>
	<img id="oceanmask" src="img/example-ocean.png"/>
</div>
Now oceansrc will no longer be needed.
Background themes
If you replace index.html in your map URLs with theme2.html, then the ShadedBay
background theme will be used instead of the Superflat background theme.
In the future I hope to add more themes, and other people are welcome to contribute. A theme consists of a background image than can compress reasonably small, and a background colour which is displayed under the background image (in case the image doesn't reach all the way to the bottom of the browser window).
Overlay icons
Overlays are where a map location overlays more than one icon to represent itself, for example the island icon can be combined with the mushroom icon to show a mushroom island.
Documentatin yet to come...
Until I write this section, you can have a look near the bottom of the legend.txt file - it implements overlays - see the bottom right corner.
Tips
Estimating distance
You can use the paper texture to estimate distance, as the distance scale is aligned with it and tells you how far 1 block of the paper texture represents.
So those two villages are about 3 squares, or 600 meters (Minecraft blocks) apart.
Adjusting labels so they don't overlap
When the map is fully zoomed in, all the labels will be shown - even if they overlap. Players always build things too close together, so you'll end up wanting to adjusting labels so they don't all overlap, here are some ways to avoid overlaps
- Decreasing the scale of the map by decreasing the range causes locations to be shown further apart.
- Caption width can be reduced by splitting it into more than one line.
e.g.
"aeduna's\nreanimated\nvillage" - Lines can be nudged left or right by adding spaces to the beginning or end of the line.
(Note that html collapses multiple spaces into one, so if the locations list is a wiki page then you'll have to type out the code lots of times instead of just hitting the spacebar)
e.g." Fortified\n village" - Captions can be nudged down by adding a new-line to beginning of the caption.
e.g.
"\nGhost town" - Using tildes, the owner part of the caption can be hidden, or the description part, or both parts. Hidden captions can still be viewed with the hover-text.
e.g.
" Fortified\n village" , "~Lex86~"
For more information see description format, or the example map where all the examples above were borrowed from.
Making it zoom in further
You can add more/deeper levels of zoom. However there are drawbacks to this so the released version doesn't do it.
Instructions on how to add more zoom levels are given in these two forum posts.
Short URLs
You can use TinyUrl or bit.ly to hide the settings you include in the URL, and to make the URL shorter.
Rei's Minimap
If you use Rei's Minimap and already have locations saved as waypoints, you can extract
the location information from the .point files to add to your map. The .point
files can be found at:
%appdata%\.minecraft\mods\rei_minimap\
They can be opened with Notepad or a text editor, and each location is stored as line of text in the following format:
name:x:y:z:visible:color
Philosophy
Extra features can improve the map and perhaps will happen with time, however the original idea behind this map was to preserve Minecraft's world-exploration gameplay. It's intended to be like ye olde fantasy-genre map - having to work out where you are, what direction you face and what direction to head, more of a guide really. Put on your adventurer's cap.
It was made for our no-cheats/shortcuts survival server. Overviewer already caters nicely for the opposite philosophy.
What'd be nice is a web-UI for people to enter their locations in with, but that would need a lot of hours, and it would mean everybody's maps depend on the server being maintained.